Transfer master data into a second company
The sister company in Austria runs its own SAP company CAMBIRA_AT and needs the same items as the
headquarters. This guide sets up the transfer: "Artikel Cambira Austria" fetches the items of two
item groups from your own company and writes them into the Austrian one.
The key is what matters: ARM-4711 is called ARM-4711 in both companies. As long as that
holds, Xchange recognizes every item in the target, and a translation table is unnecessary — the
whole setup consists of one connection, one route and one key row. If it does not hold,
another path leads to the goal; it is described at the end of the page.
What you need
- The permissions Connections and Routes, each at the level Full — see Permissions.
- The credentials of the second company: base address of the Service Layer, company database, user name and password.
- Starting point: Configuration → Connections.
Xchange saves every entry automatically. It takes effect in operation only with the activated configuration snapshot — that is step 5.
1. Create the connection to the second company
For Xchange, the second company is a target system like any other and therefore needs a connection of its own.
- Connections → Create, type SAP Business One. The type is fixed after creation.
- Enter the Base address — the address of the second system's Service Layer, e.g.
https://sap-at.cambira.intern:50000. - Enter the Company database:
CAMBIRA_AT. This field tells the two companies apart. If both are on the same server, the base address is identical and only the company database differs. - Enter the User name and Password of the login user in the second company.
- Test connection.
Two messages are built for exactly this case, and both mean that a different company is entered than the one intended:
| Message | What it means |
|---|---|
| This company database is the one the Xchange service itself uses | You entered the source company instead of the second one. |
| Company database is used more than once on this base address | A connection for this company already exists — use the existing one. |
SAP Business One brings its Field structure along by itself. The full path of a connection is described in Create a connection.
2. Create the route
- Configuration → Routes → Create.
- Direction Export, type Processing — the route reads in your own company and writes outward.
- As Connection, choose the one you just created.
- Name:
Artikel Cambira Austria.
How a route is created in general is described in The first route.
3. Say which items are meant
On the Source data tab:
- Fetch endpoint:
Items. - Single-fetch endpoint:
Items('{{ItemCode}}'). It is needed as soon as someone pushes individual items on purpose. - Take over only the items that are needed. The Austrian company carries two item groups of
the item master,
100Armaturen and101Ersatzteile. In the Data filter section, create:ItemsGroupCodeequals100, combination OR, second rowItemsGroupCodeequals101. - Count matches — in the example 1,186 of 2,418 items.
The data filter applies to every run, including the full one: a full run transfers the entire dataset within the filter. The way to the finished filter is described in detail in Narrow down with a data filter.
4. Map the fields and set the key
On the Mapping tab:
-
Map the fields that are needed over there. Because both sides are SAP Business One, they have the same names:
Target field Source ItemCodeOriginalPayload.ItemCodeItemNameOriginalPayload.ItemNameItemsGroupCodeOriginalPayload.ItemsGroupCode -
Open the Step settings and set Write intent to Create or update — an item that does not exist over there yet is created; the route updates an existing one.
-
Target endpoint:
Items. Below it, the Item endpointItems('{{ItemCode}}')appears — SAP Business One prescribes this address, and it cannot be changed. -
Set Key source to Mapping or source. A row with the Key
ItemCodeappears below it. -
As the Value of this row, choose the row
ItemCodeunder Mappings.
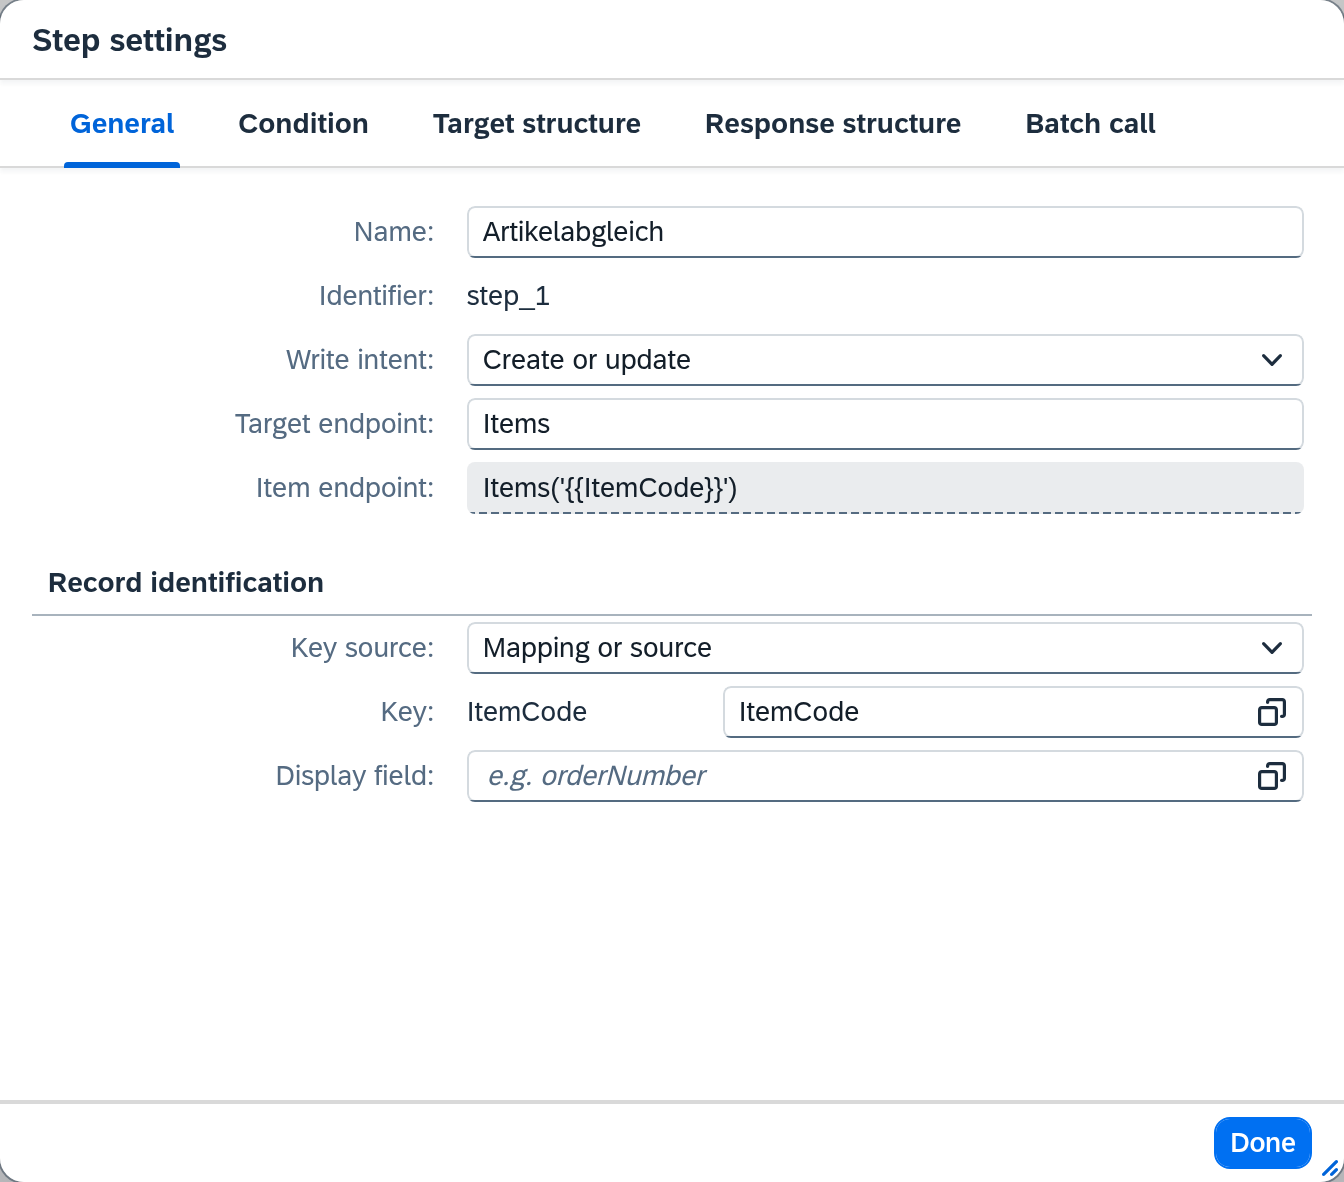
Why that is enough: Xchange takes the value of the mapping row — ARM-4711 — and inserts it
into the item endpoint. The address of the record is therefore fixed before anything is written; a
lookup and a table that translates German numbers into Austrian ones are not needed. Before
writing, Xchange reads the item at this address: if it exists, it is updated, otherwise it is
created. What Xchange remembers in the process is described in the core concept
Writing to the target system.
5. Validate and activate
- In the Test area of the Mapping tab, have an item calculated and look at the result.
- Activate the configuration snapshot — see Validate and activate.
Only with the activation does the route take effect in operation.
If the key is not the same in both companies
The whole path above depends on one precondition: that the same item carries the same number in both companies. Where that does not hold — e.g. because the second company has its own numbering — Mapping or source reaches its limit, because the value from the source points nowhere there.
In that case, set the Key source to Target system lookup instead: before every write, Xchange looks up the record by a field you specify and writes to what it finds. How this lookup works and what happens when it finds nothing or several records is described in the core concept Writing to the target system.
What comes next
This guide sets up what is transferred. When it runs is decided by the schedule, and that is also where the choice between a full and an incremental run lies — in the example incremental at two o'clock at night, full early on Sunday.
- Run on a schedule — create the schedule
- Transfer only what changed — so that the nightly run reads only the changed items
- Transfer deletions or deliberately leave records in place — what happens to an item that drops out of the data filter
See also
- Create a connection (guide) — the complete path to the connection
- Routes — Mapping (reference) — all fields of the tab, including the other options of the key source
- Routes — Source data (reference) — the fields that step 3 fills
- Connections (reference) — all fields of a connection
- Writing to the target system (core concept) — where the key in the target comes from and what Xchange remembers